Exchange files ("All-In-One Chat" interface mode)
Sending files
Select one or several recipients in Contact List by pressing and holding Ctrl key for subsequent file transfer. In order to search for a user type few letters in the edit box with the "Contact search" tip text above the users list in order to display only contacts whom first/last name and/or account starts from that symbols. An empty (by default) edit box shows full Contact List.
For more information on how to organize your personal Contact List see the Organize Contact List topic.
 |
The ability to send files is configured and managed on the IM server so if the server's options restrict file transfers you will not be able to send files to other users and on messaging groups. |
 |
| Sending files and folders |
Then press  Transfer files button on the toolbar or just drag and drop files to the chat window with selected recipient. It is also possible to right-click on a recipient name in Contact List and then select "Transfer files..." item in popup menu.
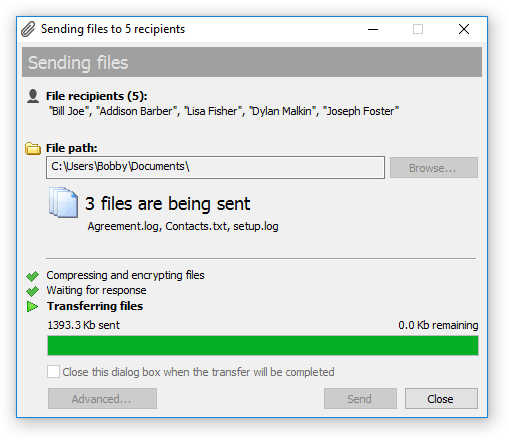
In the File Transfer dialog box click Browse... button to select files you want to send to selected recipients. You can simply drag-n-drop documents and folders to the transfer dialog box. Check the "Close this dialog box when the transfer will be completed" option to automatically close the transfer dialog box when the files will be delivered.
If your account type is having appropriare right on the IM server then Advanced... button is available to you that opens the Set advanced options dialog box to set up transfer flags.
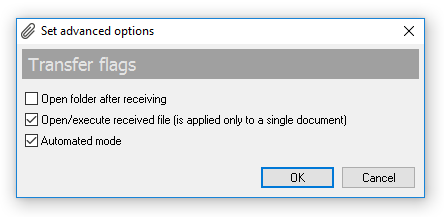 |
| Set up transfer flags |
You can set up the following flags for the transfer:
- "Open folder after receiving" — Use this option to automatically open a folder with transferred files on a recipient computer when the transfer will be completed.
- "Open/execute received file (applies only to a single document)" — If this checkbox is used then the file will be automatically executed or opened by appropriate application on a recipient computer. Please note if you transfer multiple files and folders this option is ignored.
- "Automated mode" — Using this option will automatically initiate the transfer process in a recipient messenger with no options to accept or decline available to a recipient.
Click
Send button to initiate the transfer.
You can also deliver files and documents to offline users if the IM server's options configured for this. The server asks you to save the data as offline when some or all from your recipients are currently not available on the IM network.
|
Depending on settings confugured on a central IM server users are also able to exchange files without showing separate file transfer dialogs. In that case data is sent and received directly from a conversation window by choosing or dropping files into the dialog. |
Receving files
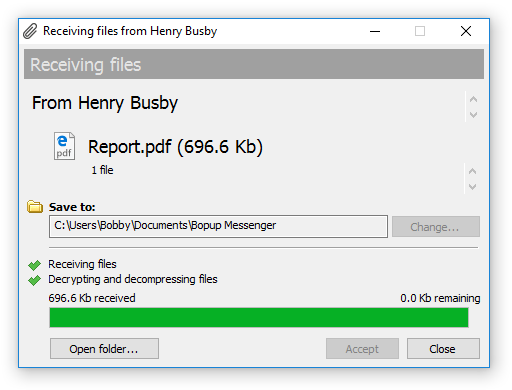
On a new incoming file transfer the messenger automatically opens and displays the Receiving files dialog box. It contains a sender name, list and size of delivered files. In cases when the chat window is closed (minimized) or another recipient is currently selected in the contacts then Bopup Messenger starts to blink it's icon in system tray area  and also an icon near the sender name in the Contact List.
According to receiving settings the messenger plays a sound file, restores (pops up) the main chat window, etc. on a file receipt. Those options are separate for personal (private) and group files transfers including assigned files delivered from the communication server.
The file transfer can be the following types:
- A Personal File Transfer that is initiated by another user
- A Group File Transfer that is initiated by user to a messaging group that you are a part of
- A File Distribution from the IM server that includes files and documents assigned to you by administrator
Click Change... button to change the folder where you want to save the received files. By defaut, Bopup Messenger stores all received transfers in your current "My Documents\Bopup Messenger" folder by creating a new sub-folder in the YYYY-mm-dd format where the YYYY-mm-dd is a date of transfer.
Click Accept to receive the data or Decline to abort the file transfer.
 |
| Receiving multiple files and folders |
Click Open folder... button when the transfer is completed to open the folder that contains received files and documents.
File transfer can be sent with a set of advanced flags that may give you no options to decline the transfer, and/or automatically open/execute a received document after it's delivering. That file transfers can be a File Distribution transfers from the IM server and transfers that are sent by users that have Administrative or Power User account type on the communication server.